Showing posts with label printmaking. Show all posts

Wednesday, November 22, 2017

Three color stacked drypoint

I haven't posted in quite a while. The projects that I've been working on are large and have consumed more time than I had anticipated. I have 2 paintings, each 2x4 feet, that I have been working on for months and months, and I've been working on a 5 plate etching series that has taken the same length of time. I'm nearing completion on both projects, and look forward to soon sharing them here in my step by step way.

But I must confess, my life hasn't all been work. My 3 big art projects have been interrupted countless times in the last 6 months by marvelous trips. We've been called to northern Europe,  San Diego and Paso Robles for the weddings of family and friends and we've joined friends in Mexico and Hawaii. My heart is full, my head is swimming with new images but I find that it's hard to remain productive while living like the rich and famous!

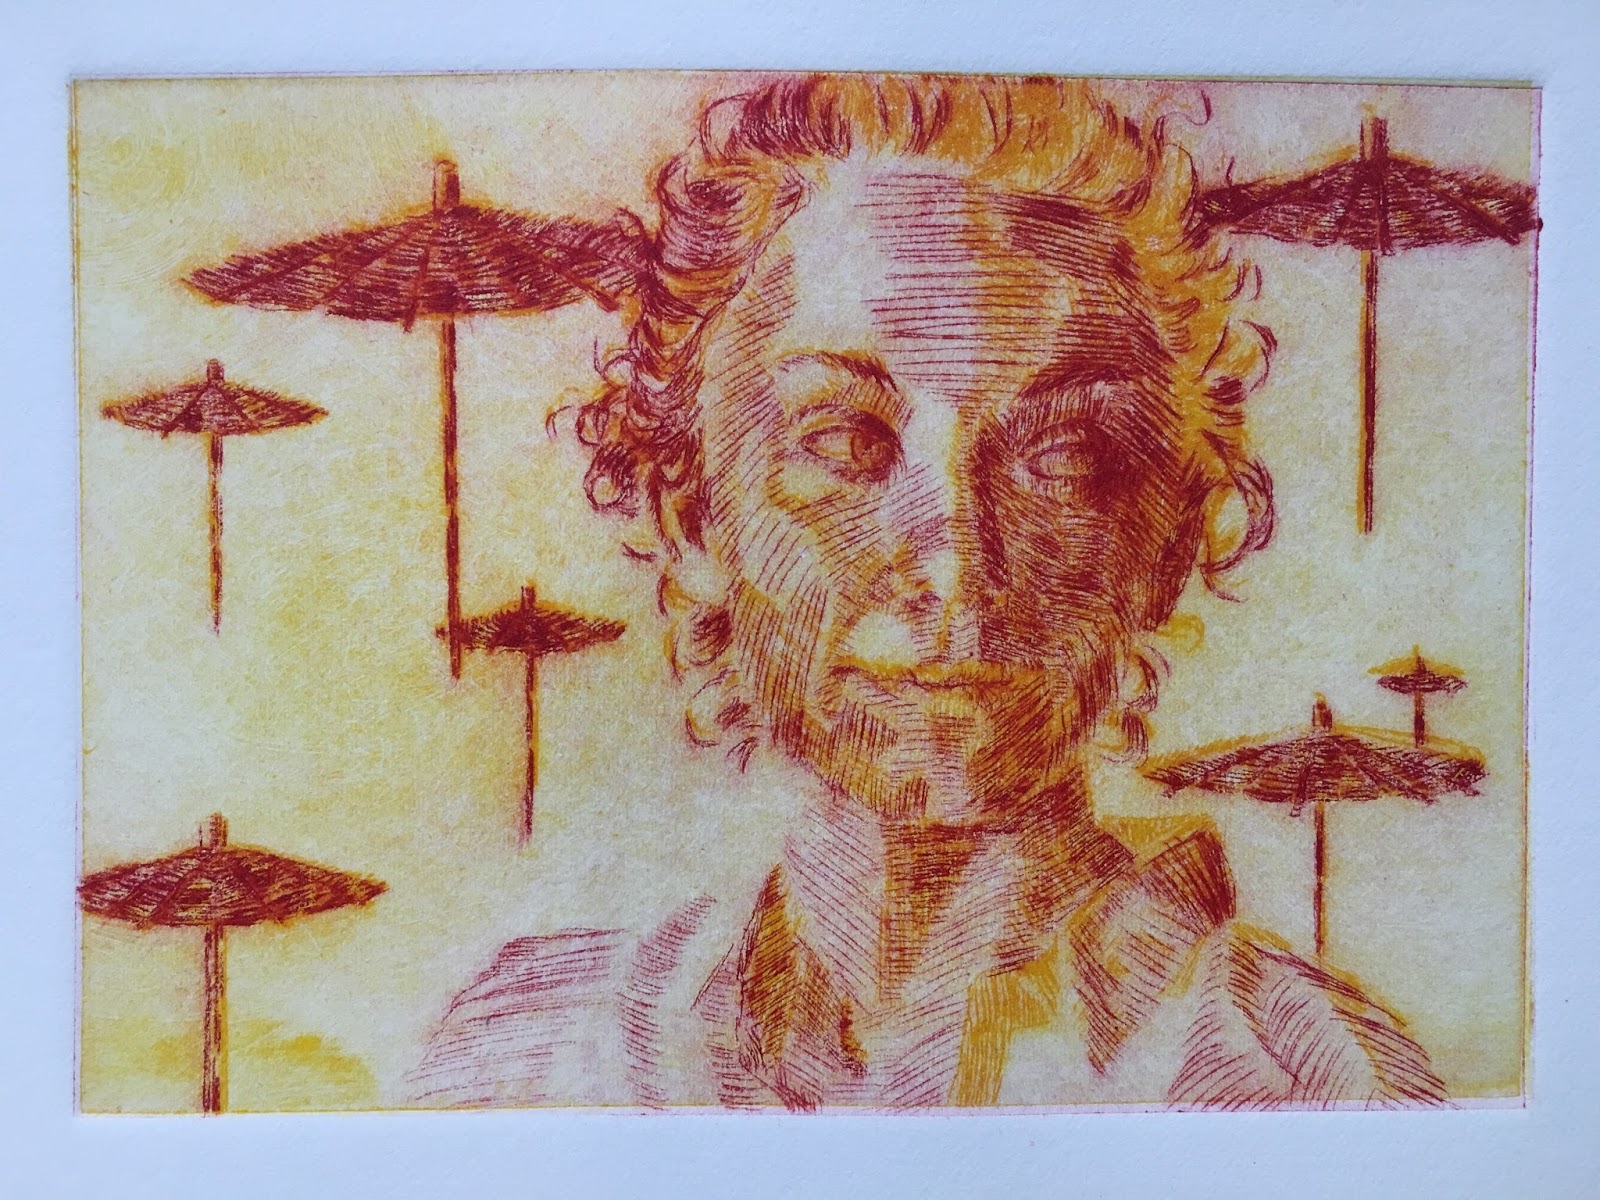
In response to feeling a bit bogged down I popped off an experiment that I was interested in trying. In the past I spent years on a series of 3 color stacked mono prints, winding up focusing on head studies. I was interested in seeing what a 3 color drypoint, creating color and value using line rather than tone, might look like. 

I didn't belabor the development of the image or the drawings. I acted on impulse, and am quite pleased with the results!

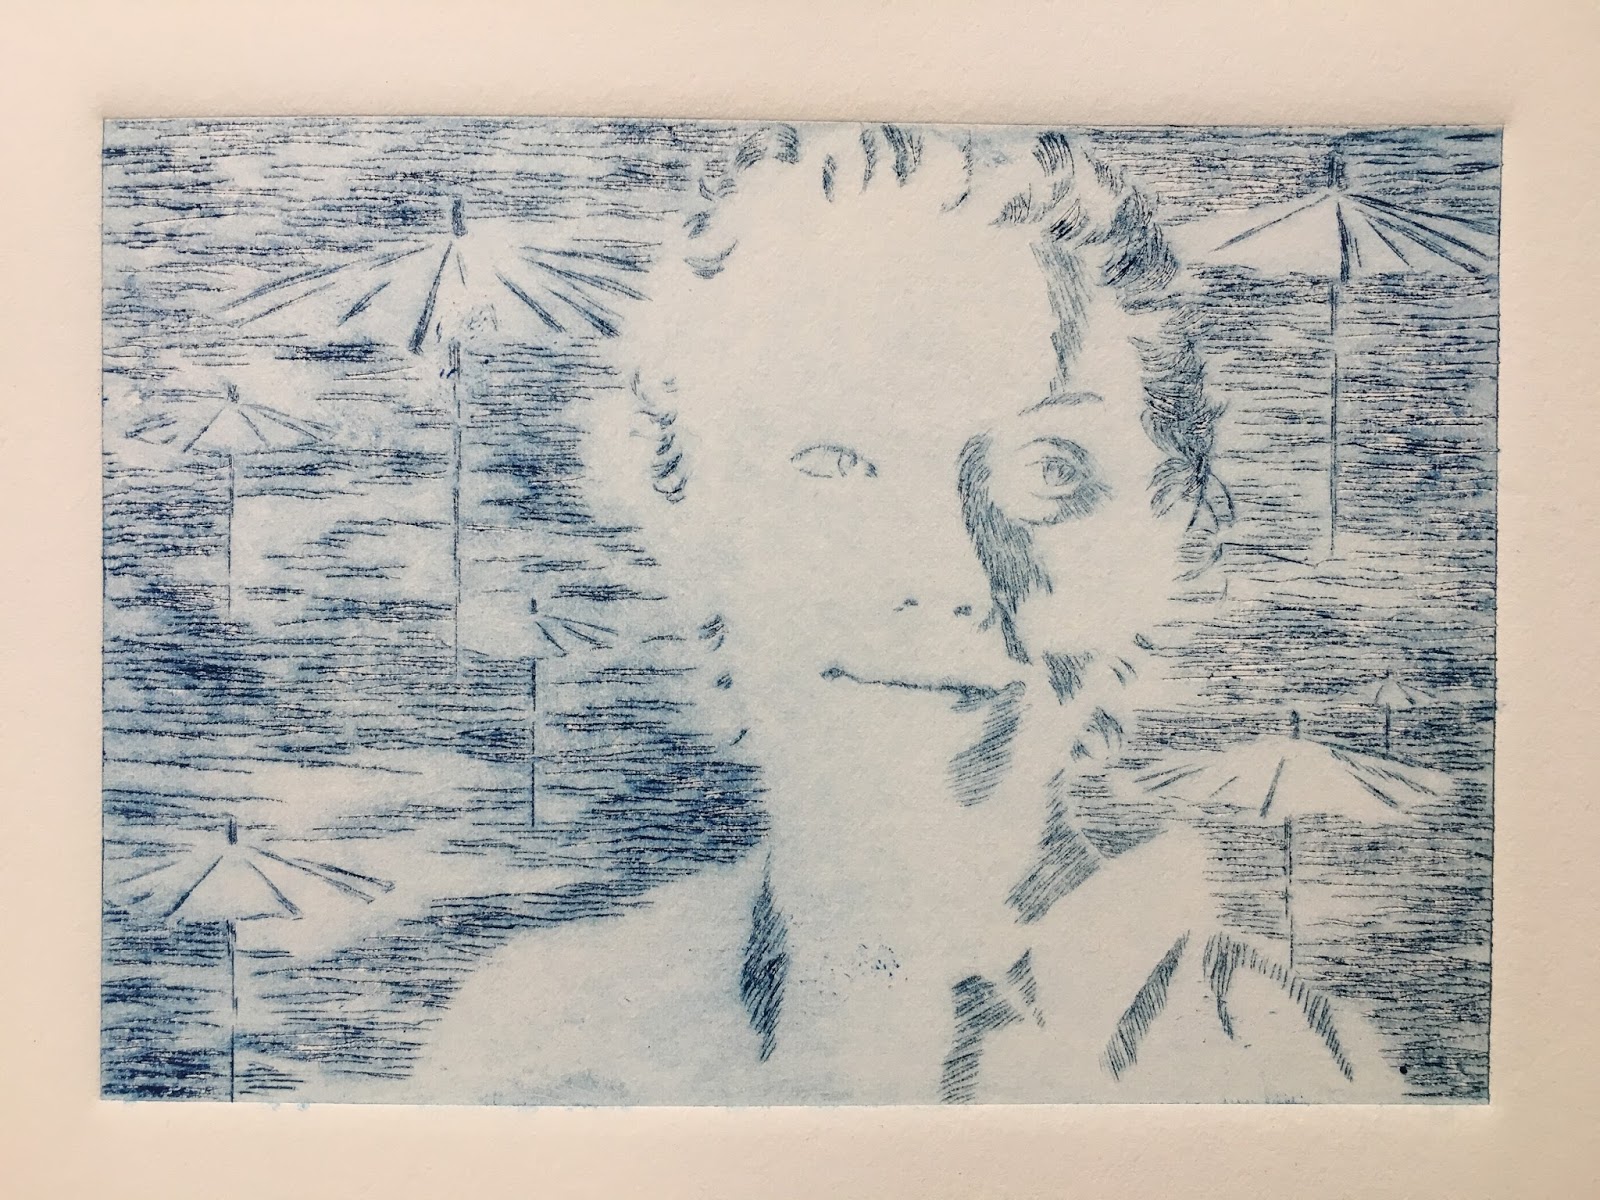
This is the first plate, where I'm establishing warm yellow tones, and anywhere I want green or orange.
This is my second plate. Here I'm drawing line where I want pure red, orange or purple.

Here is a print of those two plates, the red printed over the yellow. I like what I see, but am surprised to see that I'm not getting many secondary color mixes.
Here is my third plate, establishing the deepest darks on the face and hair and creating the environment.

And here are all 3 plates printed on top of one another! I like the result and it's raw feeling. Playing with a new technique was really fun and a perfect antidote for my long and labored projects.


Thursday, June 15, 2017

Drypoint Etching II


These are companion pieces to the seed pods I posted last time. Also 8x10, I created them using the same steps that I described in my past post.


The first print adding a blended roll. 


And the print using the ink remaining on the color plate. 

Wednesday, June 7, 2017

Drypoint etching I


I made this series of 8x10 prints a couple of months ago, but never got around to sharing it, so here we go!
 
Above is a drypoint etching, a method of making groves in a plate that will hold ink by physically inscribing them. Rather than using nitric acid to etch a line into metal, a sharp tool is scratched across the surface of a plate to both create a grove and to raise a burr that will both hold ink. The modern day printmaker is fortunate to be able to use a plastic film called Duralar which allows crisp lines and the displaced material, or burr, withstands the pressure of the press for a good number of runs. The burr gives drypoint prints their characteristically soft line.

After printing 10 or 12 of the dry point seed pods and letting them dry for a week, I mixed 2 colors of ink and rolled out a "rainbow roll". This is the blending of 2 or more colors on a single roller. I rolled the colors across a smooth sheet of plexiglass that was the exact size of my seed pod line etching. I then placed the colorful plate over my drawing on a light table so that I could see the image through the newly inked plate and wiped away the ink from the areas where my line work was.

 When I had removed the ink from the color plate in the areas I wanted to remain untouched, I carefully placed the inked side of the plate down on one of the black and white prints and ran it through the press. The resulting print had crisp black and white plus an interesting graduated color that I found pleasing.

I ran a secondary print, a "ghost print", with the ink that remained on the plate. I placed the plexiglass once again over another of my black and white prints for a trip through the press to get a softer looking print.

After printing the ghost, I cleaned the small amount of residual ink from the plexiglass, rolled it once again and made my way to the light table to carefully wipe away ink for another two prints.

Each of the 3 has a very different feel and stand alone as variations. According to personality, taste or mood, people choose  which one is most appealing to them. I like them all, and simply enjoy the process of making them!

Thursday, May 25, 2017

Etchings in process


I am starting a series of prints of hands, holding and helping. It is my quiet way of encouraging kindness, understanding and simple humanity.

After the giant wood cut I last posted I decided this time to do some small scale etchings. I began by cutting down a zinc plate to the 4.5x6 inch format I wanted. I then coated the surface of the plate with Hard Ground, a material that seals the metal. I transferred my drawing onto the dark surface of the Hard Ground, leaving the outlines of areas I wanted to break the image into. I then used a Whistler's Needle to scratch lines through the hard ground, revealing the plate below. I have varied the density of my lines according to the map I have created for myself in my key drawing. The density of the lines will create different values.


When I was satisfied with both drawings I placed the plates in a vat of nitric acid. The acid eats away the metal only where my lines have exposed plate. The longer the plate is in the acid, the deeper the grooves beneath  my lines become.


When I was pleased with the depth of the grooves in my plates I removed them from the acid and removed the Hard Ground. I proofed the plate in order to see how the image turned out and check if there are things I want to change. I'm sorry I didn't take photos of the printing process, but I draw sticky ink across the surface of the plate, making sure that it is worked into the groves that the acid has eaten away. I then wipe the upper surface of the plate clean, place it on the bed of a press, place paper over the plate and crank the press. The bed of the press moves under a large cylinder that applies an even pressure across the plate and the paper on top of it, and the ink transfers to the paper.
  

I printed several proofs to see how the plates behaved and to get to know them. I spent time looking at the images and felt that I was off to a good start, but wanted to enrich the line work and refine the drawings a bit. So I again coated the plate with hard ground.


Looking at my proofs at the areas I wanted to further develop, I once again drew into the Ground to expose the plate.


The shine of the metal shows where I am enriching the line work.


The Whistlers Needle is a twisted length of metal that comes to a point on either end.

Here you can see the plates next to the proofs. Notice that they are the mirror  reverse of one another.  You can understand why if you envision that the print is a result of having been placed face down on top of the inked plate. Imagine the photo above folding in the middle and the 2 images come together like pages in a book.

Because plates are always backwards from the printed image, and printmakers are constantly working on plates to achieve an end product that a will be the reverse of what they see I'm pretty sure we are the least likely pool of people to ever suffer from Alzheimer's. We spend countless hours doing remarkable mental gymnastics keeping our synapses limber!

I touch up the edges of the plates to protect them from the acid. And they get another half hour  bath in the acid.

This time when I proof the plates I am satisfied with the drawings. However, I am not done. I plan to put a middle value behind the hands in order to create more depth. I will not use lines, but do an aquatint that will create an overall tone. I will protect the drawings by coating them with hard ground and then sprinkle rosin across the surface of the plate. I will then heat the plate so that the rosin melts into small dots stuck to the plate. When I again put the plate in the acid the open areas will etch all around the little dots of rosin and the surface will become pitted. The longer I leave it in the acid the rougher the plate will become, creating a deeper and deeper value as it will hold more ink.

That step will not happen until fall when I again have access to the magnificent print studio Vinita Vgood has created at Golden West College.